Showing posts with label hacking. Show all posts

Saturday, July 23, 2011

Easy SQL Injection [Using Havij 1.5]

Introduction:

I received a request from Don Sam  to post a tutorial that guided that focused on SQL Injection. SQL Injection itself can be a pretty advanced and overwhelming topic, so I decided to introduce a small, lightweight utility known as Havij. In this tutorial, I'll be using version 1.5.

I will assume you have downloaded Havij and have selected a target website. If you haven't downloaded Havij, you can do so here. If you don't have a target site in mind, you can head on over to the Devil's Blog On Security for a list of common SQL Dorks. All you have to do is choose one, then Google it. The websites in the results are possibly vulnerable! Just copy the web address to the clipboard for use later.

Step 1:

The first thing you need to do is paste the address of your target into the text box labeled Target, then choose Analyze. Havij will then test the target to see if it is vulnerable to SQL Injection.
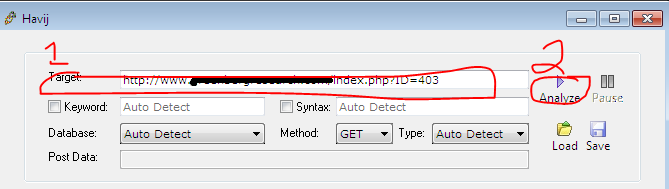

If the target is vulnerable, Havij will return the name of the database being used at the URI you supplied.


Step 2:

After you have determined that the target is vulnerable to SQL Injection, you need to get a list of all of the tables in the DB. Do this by choosing the Get Tables option.


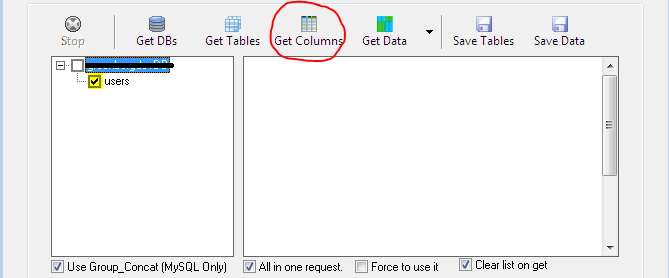
Havij will then return a list of all of the tables in that DB. Check the tables that contain the data you want, then choose Get Columns. This will return a list of the columns in that table.

Step 3:

Once Havij has finished looking for the columns in the table, it will return a list in the tree structure under that table. Check the columns you want, then choose Get Data.


Finally:

As Havij extracts the information from the columns of the table, it will be displayed in the whitespace to the right. Most of the time, this information isn't even encrypted. If it is a column of password, it may be encrypted with an MD5 Hash, but that is pretty easily decrypted! 


Conclusion:

So, you have just conducted a successful SQL Injection attack on a vulnerable website. While vulnerable databases aren't as common anymore, there are still many, many, many out there. In my research, I Googled a SQL dork and the first site was vulnerable!

If you have any questions, comments or concerns, please feel free to comment below!

Did you know that i7's Guide to hacking can be delivered daily to your kindle devices? Subscribe Now! 
 

Friday, July 15, 2011

Decrypt MD5 Hash

Introduction:

The most popular type of encryption for usernames, passwords and other important information is MD5. It is strong, one-way and overall, pretty secure. The only problem is, once you have encrypted so many different strings into an MD5 hash, you begin to realize how the encryption works and begin to realize a mathmatical pattern of sorts.

Due to the everyday use of this encryption, it is now very easy to decrypt an MD5 Hash. The best part is, it doesn't even require any programming.

This post will walk you through the easy step of decrypting a hash using MD5Decryption.com. I will assume you already have your MD5 hash ready and that you have opened MD5Decryption.com in your browser.

Step 1:

Actually, this should be the Finally heading! There is only one major step. Just paste the MD5 string into the text box at the bottom of the page, then choose 'Decrypt'! For this post, we'll use this hash:

5687928ebab58b39f8814dfc33cdfab1

Which decrypts to this string:

testmd5string12


After it checks the hash, it will decrypt it then display it on the screen! Your done!


Tuesday, July 12, 2011

Create a Live USB Version of BackTrack

Introduction:

There have been several people ask me how to create a Live USB version of the BackTrack Pentesting Suite. This actually happens to be a very easy task, if you know what you are doing. So, I decided to dedicate a post to guide those who aren't quite sure through the process.

Step 1:

You are going to need to make sure you have everything you need, before we start. In order to create the live USB of BackTrack, you're going to need a copy. Visit the BackTrack download page to download the latest copy. With the new version, 5, you have several different options to choose from when downloading. Choose what you want, then either download the ISO directly, or download via a torrent.                                          
The second thing you are going to need is a program called Unetbootin. This program will do the hard work for us. This program, like BackTrack, is also free and can be downloaded from it's Sourceforge page.

Step 2:

Now that you have everything you are going to need, let's begin! The first thing you need to do is launch Unetbootin. This program doesn't come with an installation wizard since it is lightweight. So, if you saved the file in a location somewhere, navigate to it and double click it. If you chose to run the program when downloading, then you should be set! Just make sure it is open.

Step 3:

After Unetbootin loads, shouldn't take but a second, you will need to choose the option for an Disk Image and set the option to ISO. Once you have chosen that, browse for the BackTrack ISO you downloaded earlier. [See image below]


Finally:

 Now that you have the basic options set, you need to set the device options. This is VERY important. For the type, choose USB. Then choose the drive letter of your USB Flash Drive that you want to use. Then choose Ok. [See image below]


Unetbootin will now install the files and the bootloader so you can boot BackTrack from your flash drive. This will take a while, just give it time. After it completes, just choose Exit and you're done!

Conclusion:

See, wasn't that easy! Now all you have to do is make sure the drive is plugged in to an available USB port when you boot your computer. Just press the boot key to display the Boot Options, and choose your flash drive!

Did you know that i7's Guide to hacking can be delivered daily to your kindle devices? Subscribe Now!

Monday, July 11, 2011

Easily Crack WEP With BackTrack [Using aimon-ng, airodump-ng an aircrack-ng]

Introduction

If you have ever thought about hacking, a wireless network is most likely the first thing you wanted to hack, at least if was for me. While it might seem a little overwhelming, it actually isn't. A WEP network can be hacked in as little as a couple minutes. Yes, WEP is not widely used anymore, but many people still use this encryption for their networks. In this post, I will walk you through the steps of hacking a WEP network and decrypting the key. I will assume that you already have BackTrack booted and have a Konsole window open.

Step 1:

The first thing we need to do is change the MAC Address of the wireless card. We spoof this address so we will be able to associate with the access point. To do this, we first need to put the interface down. We do this by issuing the following command in our open Konsole window:  ifconfig wlan0 down

NOTE: Usually, the wireless interface is called wlan0, but in some rare cases, it has been named wlan. To find out which is yours, issue the following command:   airmon-ng 

Step 2:   

Now that the wireless interface has been disabled,  we need to spoof our MAC Address. This can be done by issuing the following command in the Konsole window:  macchanger --mac 00:11:22:33:44:55 wlan0

Step 3:

Now we need to not only put the wireless interface back up, but we also need to start it in monitor mode. This way we can collect the packets we need to decrypt the key later on.  To do this, we simply issue the following command in our Konsole window:  airmon-ng wlan0 start

Step 4:

Now we get to start the fun part! We need to find a network the uses the WEP encryption. To see a list of the available networks, run the following command:  airodump-ng wlan0

After you have chosen your target network (for legal purposes, I will assume it is yours ), we need to start collecting the packets that are being sent between the access point and the clients. To do this, issue the following command: airodump-ng -c [CHANNEL] -w [FILENAME] --bssid [BSSID] wlan0

NOTE: Replace the brackets ( [] ) and the data inside with the proper values displayed by airdump-ng wlan0.

Step 5: 
Now, we have begun collecting packets that are being sent between the access point and the clients. Depending on how many people are using the network, this may take some time. In most cases, there won't be a large number of clients on the network. So, let's speed things up by adding some fake traffic to the network. In order to fake network traffic, the wireless interface has to be associated with the access point. Do this by issuing the following command in a new Konsole window:   
aireplay-ng -1 0 -a [BSSID] -h 00:11:22:33:44:55 wlan0

After you see a message alerting you that association was successful, issue the following command in that same Konsole window:

aireplay-ng -3 -b [BSSID] -h 00:11:22:33:44:55 wlan0


After running that command, your other console window will begin collecting data fairly fast. You can keep an eye on the number of packets collected by the number displayed under the #Data heading in the Konsole running airodump-ng.

Finally:  

After you have collected several thousand (You might even need several hundred thousand ) packets, stop everything and run the following command to decrypt the network key:   

aircrack-ng -b [BSSID] [FILENAME-01.cap]

This may take a while, just be patient. After aircrack-ng has run, it will let you know whether it was able to decrypt the key or not. If it wasn't, then try it again, only collect more packets. If it was able to decrypt the key, it will display it on the Konsole window!

Conclusion:

Ther you have it! You have just hacked a wireless network using the WEP traffic encryption!